Top Ghia - 1956 Karmann Ghia
Part II: Attention to detail creates an award-winning Karmann Ghia
09/23/2018
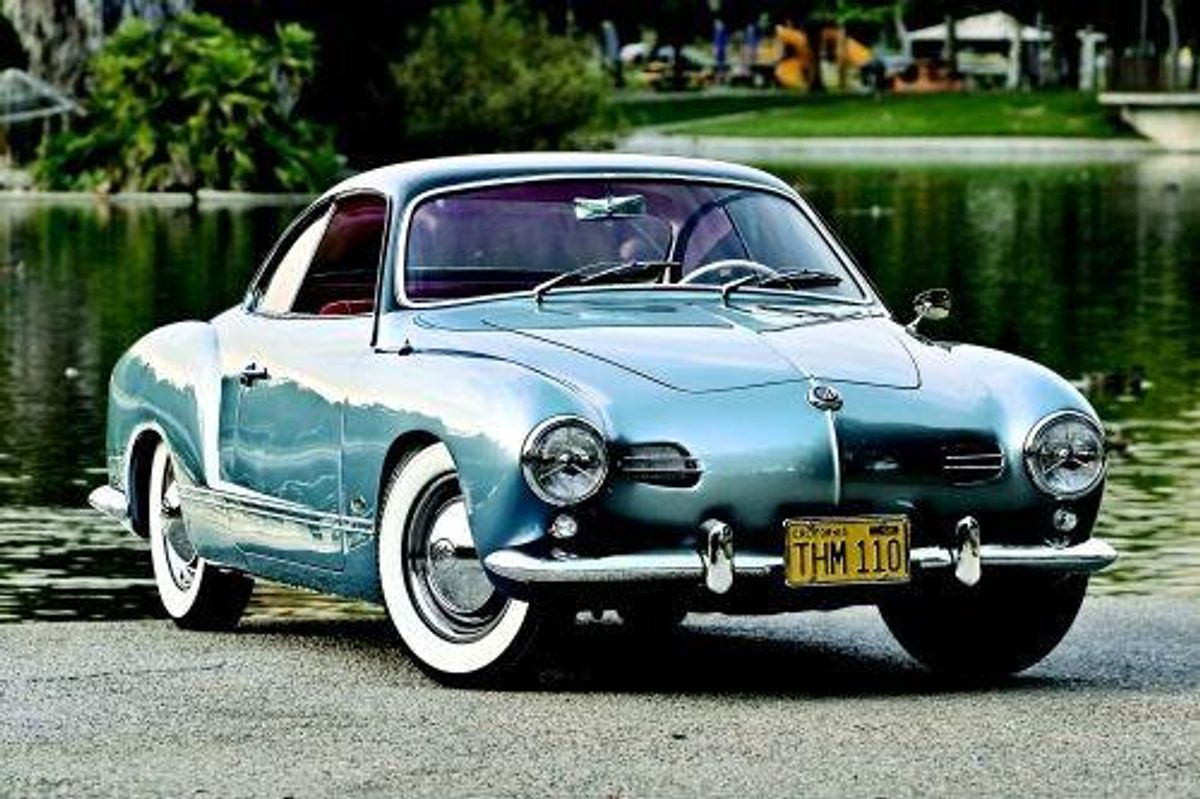
Has there ever been a better-looking Volkswagen than the Karmann Ghia? You'll hear few enthusiasts arguing otherwise. And within the Karmann Ghia hierarchy, it's the earliest model, the so-called "low-light" design with its low-mounted headlamps and gently tapering front fenders, that most fans the flames of desire.
Jason Walston was determined to carry out a restoration that would do justice to the car's sensuous lines. From the moment he bought the car as a basket case from a local Volkswagen collector, he knew that his goal would be nothing less than perfection. Never mind that a scarcity of parts and the challenge of repairing their hand-built bodies make 1956-1959 Karmann Ghias especially tricky restoration projects. Jason, an experienced restorer, didn't blink. "I've done several body-off, full restorations, so I knew what to expect," he said.
If you read last month's installment, in which we told you how Jason brought the Ghia back to mechanical health, restoring the pan and rebuilding the transaxle and 1,192cc, 36hp flat-four, you'll know that one of the keys to his success is his methodical preparation. That trait served him well in the cosmetic aspects of the restoration, too. He chose to bring the body to Leonardo's Body Shop of Garden Grove, California, the shop that had done such stunning work on his prior restoration project, a Volkswagen Double Cab Transporter. When he restored the Double Cab, "I was trying to find someone who was an up-and-comer, who could do really good work without charging an arm and a leg," said Jason, the general manager of a Long Beach, California, company that sells and services fire trucks. "I just started asking around." His inquiries eventually led him to Leonardo's, and its proprietor, José Leonardo.
Jason believes that successful work comes from clear communication, and from a shared enthusiasm about the project. "You need to be incredibly detailed about what you want done," he said. "A body shop will pretty much do what you tell them to do, but they're not going to do more than you tell them to do." Jason made clear his high expectations for the Ghia, but he didn't leave it there. Every week or two, he would visit Leonardo's to see the progress, and would share with José photographs of the work he was doing at home on the chassis and running gear. "You need to make sure you convey your passion to these guys," he advises.
Though it looked like a shed, the Karmann Ghia actually had less rust-through than you might suppose. Jason had already cut out the corrosion and welded in fresh metal, so Leonardo's began by having the body stripped with plastic media. Plastic filler was applied to each panel, and then sanded down with a long board until nearly no filler remained, a process that was repeated seven times. Several coats of Glasurit primer were applied, followed by four color coats and four clear coats, also made by Glasurit. If you guessed from the quality of the finish that the shop used nothing but top-of-the-line tools, guess again. "It was a very, very basic painting booth, a very, very basic gun. This is not high-end equipment," Jason said. Where the money was spent was on paint. "It was really expensive, but it's nothing compared to what you're investing in the car," he reasoned.
After about eight months, the body was finished. "I liken it to a Fabergé egg at this point," Jason said--that is, as fragile as it is beautiful. "These body lines need to be crisp, and it looked as if they had just stamped the sheetmetal yesterday." He could have trailered the body home, hoisted it into the air, and reunited it with the finished chassis, but he had a better plan: He trailered the chassis to Leonardo's, and helped five workers carry the body over to the trailer and lower it onto the pan. Job done, just like that.
 Restored instruments kept their original faces
After installing the wiring, cables and trim, Jason brought the car to Kustom 1 Upholstery of Orange, California. Although they have a low profile among the concours crowd, "they do fantastic work," he said. With nothing to go by but some grainy, black-and-white photographs from the factory, Kustom 1 crafted correct leather upholstery and door panels. Correct German square-weave carpeting and a mohair headliner completed the interior. A fuel gauge, a rare period accessory, came with the car, and Jason found an NOS sending unit in its box to replace the original, which was beyond restoration.
Back in his home shop, Jason reinstalled the rebuilt engine, complete with Judson supercharger, a rare and highly desirable period performance accessory. "It's a tight squeeze, especially with the supercharger on it," he said. To ease installation, he raised the car evenly with four jack stands, so that the engine would not have to be tilted as it was raised into position on a floor jack. Judson expected Karmann Ghia owners to cut a hole in their engine lid to clear the supercharger, but Jason couldn't bring himself to grab the tin snips. Instead, he machined the top two inches off the carburetor, allowing the unit to clear. Who needs a choke in Southern California, anyway?
After sorting out a couple of teething problems, including a leaky flywheel seal caused by an incorrectly set end play on the crankshaft, Jason reports that the car "runs great. It definitely is a torquey engine; it's like a tractor. You can take off in third gear from a dead stop if you want to. It rides smooth, and it handles fantastic." So, having tasted the result, what would he have done differently in the two-year restoration? Nothing. "I don't look back at it and say, 'I wish I'd done this or that.' I built it right the first time."
 Only cars built before August of 1959 wore the handsome ''low-light'' front-end styling
PHOTO 1
At Leonardo's Body Shop, the body was mounted to a custom-made rolling rack, and then media blasted down to bare metal. Despite its rough appearance, the car showed no sign of any accident damage; even the factory spot welds in the inner front fenders were intact
PHOTO 2
Getting the body ready for paint was a laborious process of applying plastic filler, sanding with a long board to remove almost all of the material, and repeating the process again and again. These hours of labor are the key to achieving a show-quality finish

PHOTO 3
After the car was sprayed with Glasurit primer, areas were carefully masked off so that only the specific area to be painted was exposed. Leonardo's worked from the inside out, finishing the interior and enclosed spaces before applying the base coat to the exterior
PHOTO 4
Areas like the engine compartment were masked off and sprayed individually, even though they're the same color as the exterior. This attention to detail results in a nearly flawless finish. The doors, hood and trunk were removed, and finished one side at a time
PHOTO 5
The roof was the last part of the body to be finished. The break line between the two blues was a bit off at first, so the painter agreed to redo the work. Four base coats of Glasurit Breakwater Blue Metallic and Dark Blue Mica were followed by four clear coats
PHOTO 6
Leonardo's finished the wheels to match the roof, and provided samples of Breakwater Blue Metallic and Dark Blue Mica that Jason used in selecting the car's interior color. The period-correct, reproduction Firestone whitewall tires are from Coker Tire
PHOTO 7
While the body was at the shop, Jason sent the bumpers and other brightwork out for replating, so that everything would be ready to install once the body was done. He made many telephone calls, and inspected various companies' work, before choosing a plating shop
 Owner Jason Walston
PHOTO 8
Six pairs of hands transferred the finished body from its supporting rack to the restored pan. Jason had glued down the seals and brought all of the fasteners with him when he transported the pan to the body shop, so that the body and pan could be reunited
PHOTO 9
Back at home, Jason installed all the trim pieces, applying masking tape around screws and other fasteners to protect the paintwork from slips. He also installed the wiring and cables and refitted the rebuilt instruments, which feature their original faces
PHOTO 10
Kustom 1 Upholstery fabricated the door panels and seat covers, using black-and-white factory photographs for reference. The correct German square-weave carpet in Crimson complemented the leather upholstery and mirror-finish painted dashboard
PHOTO 11
This seat design was used for only two years, so it's fortunate that the car still had its original pair. After broken welds were repaired, the seat frames were blasted and powder coated. Jason made a new base and back for the back seat to replace the rotted originals
PHOTO 12
The last step was the reinstallation of the 1,192cc, 36hp flat-four, raised into position with a floor jack. Clearance in the engine compartment is tight; Jason raised the car evenly, using four jack stands, so that the engine would not have to be tilted to fit
Owner's Story
I had just finished restoring my 1960 Volkswagen Double Cab Transporter, and was looking for a new project. I wanted to do a pre-A Porsche 356 Coupe, but my wife, Amy, really enjoyed the beautiful styling of the early Ghia. I knew it would be extremely difficult to find a restoration candidate of either car, so we agreed that whichever one came up first would be the one I would restore. In August of 2004 I answered an Internet ad from a local collector who had a basket case 1956 Ghia that would be an excellent restoration candidate.
I had the car finished for its unveiling at the VW Classic show in June of 2006 To say that this was a challenge is a huge understatement. Not only was I finishing this car, but I was taking two of my other cars to the same show. This is where the help and support of my family came in; all three cars made the show, and each of them won first in its class. Amy is more than pleased with the final product, and tells me often that she's glad I didn't find one of those ugly Porsche Coupes first.
--By Jason Walston

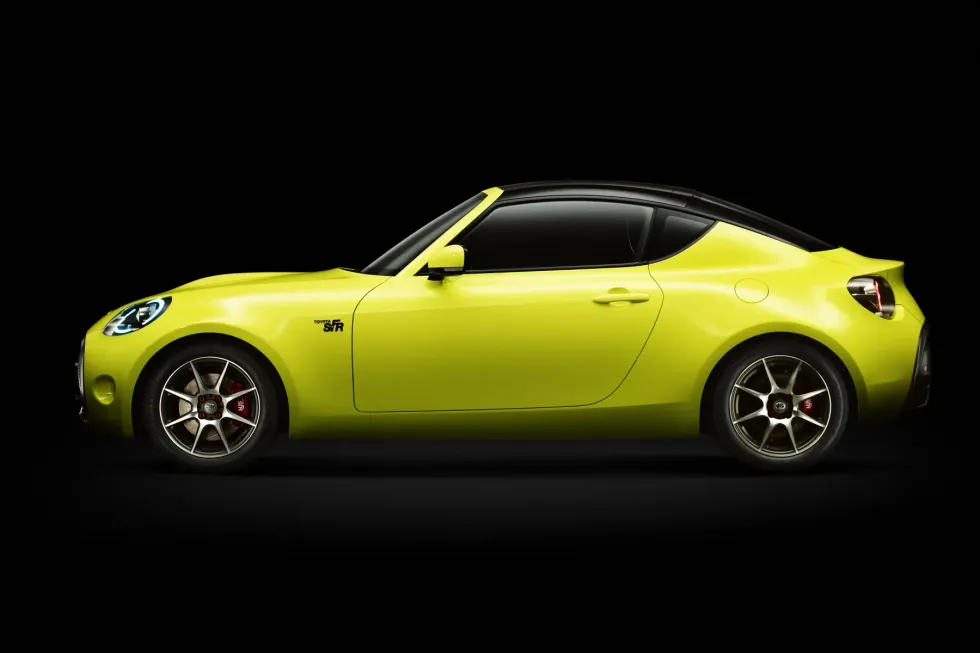
From the sounds of it, the S-FR will share a platform with the Daihatsu Vision Copen that was revealed at the 2023 Tokyo Mobility Show. It will supposedly feature the same two-plus-two seating as displayed in the concept, but will be even smaller and lighter than the Toyota 86 model.
The Toyota S-FR will reportedly get its power from a turbocharged three-cylinder engine that will send around 150 horsepower to the rear wheels. If these figures sound familiar, you may have also heard the rumors about Toyota reviving the Starlet with a GR performance version that has similar specs; a 1.3-liter engine producing 150 horsepower.

Toyota
Toyota S-FR Racing concept
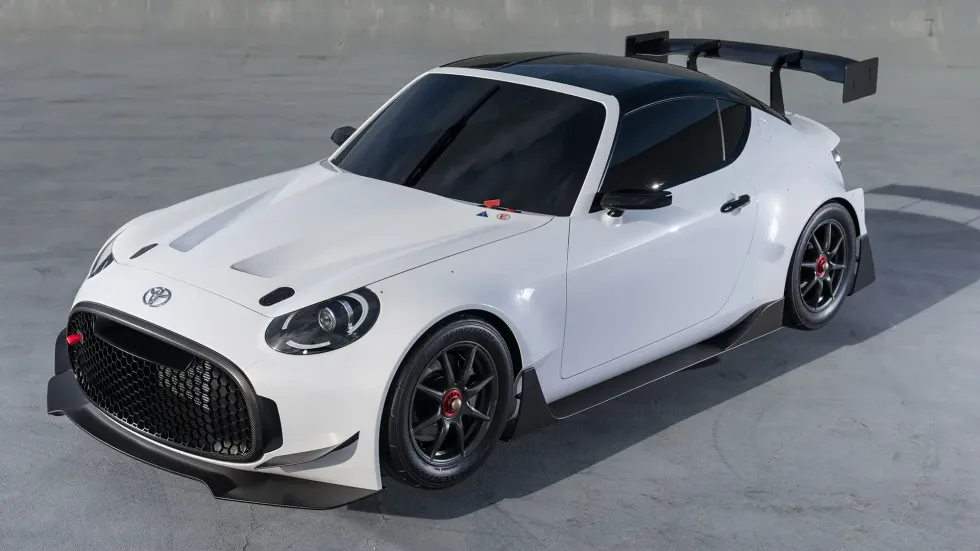
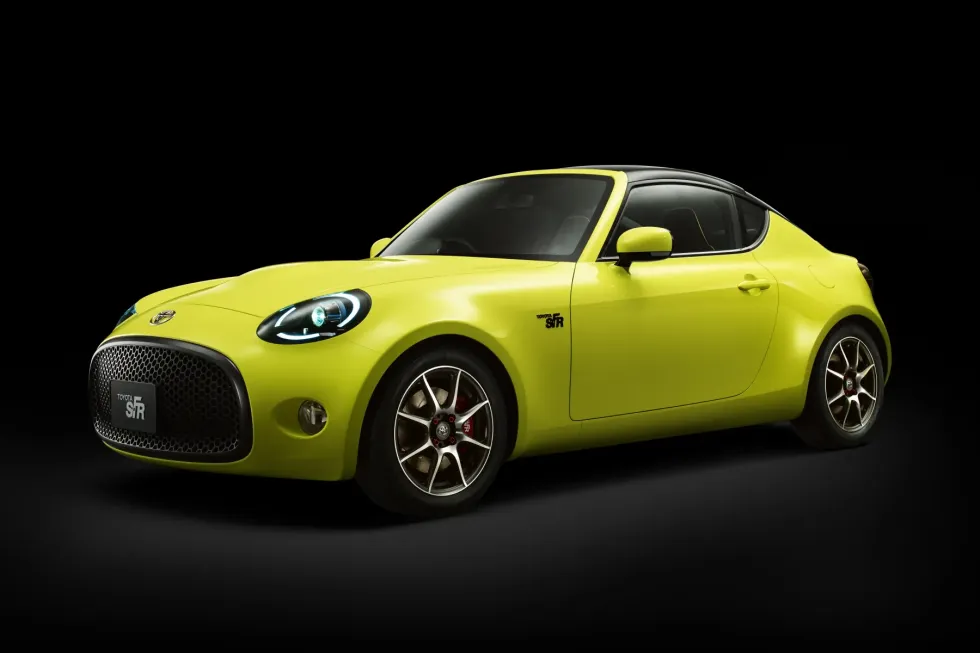
Like most concept cars, the S-FR’s design will see some changes before production, in this case reports point specifically to a smaller grille and altered headlights. Whether or not the production model will incorporate the concept’s aero elements is unknown.
Toyota’s target MSRP of $22,700 for the S-FR could potentially beat out the Mazda Miata by around $6,000. Whether or not the S-FR will be sold in the States to potentially compete with Toyota’s existing GR86 model’s sales is also, sadly, unknown, but we have our fingers crossed.


Rather than a lightweight sports car, the Aston Martin V8 is better considered a GT car, which seems to have a lot in common with American muscle cars. Even with aluminum body panels, the rather substantial Aston had a curb weight just a hair over 4,000 pounds, making it several hundred pounds heavier than a 1969 Dodge Charger R/T. It’s worth noting that despite being measurably smaller than the Charger, both cars share very similar proportions, with their long hoods, fastback rooflines, and short rear decks. An even closer comparison comes in the form of a ‘67 Ford Mustang, again with similar proportions but also the Aston having a wheelbase and overall length, width, and height very close to the American pony car.
The 1978 Aston Martin V8 is frequently referred to as a Series 3 since it was derived from the DBS, a model that launched in 1967 with an inline-six engine that was followed by the DBS V8, with a fuel-injected V8 engine. Both versions of the DBS were sold alongside each other into 1972, when, during the model year, the simply named V8 model supplanted both. With an updated front end that included a grille shape more reminiscent of Aston Martins past and a pair of headlamps rather than four, these interims V8s were considered Series 2 cars.

In 1973, Aston Martin dumped what had turned out to be a problematic mechanical fuel-injection system, instead opting for four Weber carburetors for its 5.3-liter V8. Multiple carburetion gives it good company with the likes of a Mopar 440 Six-Pack or Pontiac Tri-Power. That carburetor setup required additional hood clearance that resulted in the large scoop worn by such cars, though it was non-functional in terms of letting in any additional air to the intake.
The rest of the engine department takes a big departure from the standard American iron-block, overhead-valve setup. Aston Martin’s V8 featured all-aluminum construction and dual overhead camshafts on each cylinder head, driven by dual chains. Yes, it had hemispherical combustion chambers, even with just two valves per cylinder. Engineers specced a forged crankshaft and forged chrome-moly connecting rods.

Output for 1978 was estimated at 310 horsepower and 320 lb-ft of torque—pretty substantial numbers for a car built during the oil crisis era and before engineers had leveraged electronic fuel injection to win the battle against emissions regulations. In accordance with its muscle car vibe, most AM V8s of the period were equipped with a TorqueFlite three-speed automatic, complete with Mopar factory ratios of 2.45:1, 1:45:1 and 1:1, along with a limited-slip rear differential. A 3.31 final-drive ratio was standard, with 3.54:1 optional. A five-speed manual was available.
Distinctions from Detroit grow once you step inside an Aston Martin V8, which was essentially a handmade car, with very low production numbers. Each of the four seats was covered in leather, a material that extended to the door trim, steering wheel, shift knob and even the center console surround. Carpets were wool. Given its high price and object of luxury aspirations, each car was also packed with plenty of sound insulation to isolate occupants from road noise. Power assistance for the brakes and steering was standard, as were air conditioning, power windows and power locks.

With a 0-60 mph time of “about six seconds,” according to Aston Martin literature of the time, along with a top speed over 150 mph, the AM V8 was in nearly a class by itself. Torque wasn't quite like that of an unrestrained big block American V8 from the peak muscle car era, but the Aston Martin’s V8 engine still delivered power with a swift rush towards a redline over 5,000 rpm, though no such actual red line is indicated on the tach. Suspension included unequal-length control arms up front with an anti-roll bar and De Dion rear axle with parallel trailing arms and watt linkage in the rear. Coil spring were at all four wheels, as were disc brakes, with the rear disc inboard. Not designed to tackle a tight road course, the AM V8 was still noted as a competent high-speed handler.
This 1978 Aston Martin V8 Series 3 features a silver metallic body with a red leather interior. The selling dealer indicates that it was purchased from the second owner who it is believed purchased it from the original owner as he aged out of driving in his 90s. The car appears to have been very well maintained, with the seller sharing that the engine, transmission, paint, body and interior are all “highly original.”

Other information to note on this AMV8 are a slew of services performed last fall, including a “full tune-up,” rebuilt carburetors, new spark plugs and filters, new battery and an alternator rebuild. Everything is asserted to be functioning properly with the car seemingly ready to drive anywhere.
As one of less than 1,000 Series 3 examples made, this 1978 Aston Martin V8 coupe offers a uniquely British take on big V8 performance in a midsize car—a muscle car, but with a different accent.
Head on over to Hemmings Auctions and take a closer look for yourself.


